Form Design Consideration for Incident Classification
You need to do some form customisation to enable users to enter incident classification data.
DatixWeb Configuration Changes for Custom Incident Classification and CCS1
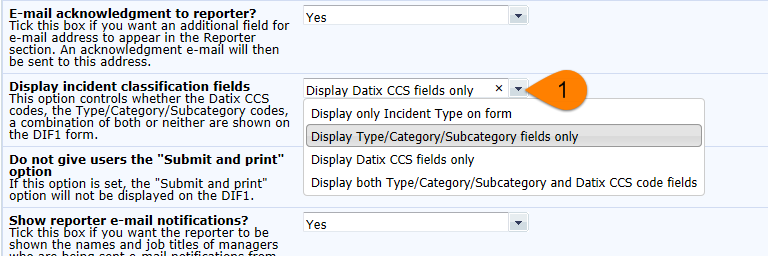
Click and click Incidents in the left-hand navigation menu. Go to the DIF1 Settings area, and choose the desired option in the Display Incident Classification Fields drop-down list. Repeat the process to choose the desired option in the DIF2 Settings area. The options are as follows:
- Display Type/Category/Subcategory Fields Only. Applies to installations with a custom incident classification system. The Incident Coding section becomes available for form design, the Datix Common Classification System (CCS) section is not available. The Datix CCS2 section is not affected by this setting.
- Display Only Incident Type On Form. Applies to installations with a custom incident classification system. The Incident Coding section and the Datix Common Classification System (CCS) section are not available for form design. The Datix CCS2 section is not affected by this setting.
- Display Datix CCS Fields Only. Applies to installations with CCS1. The Datix Common Classification System (CCS) section becomes available, the Incident Coding section is not available. The Datix CCS2 section is not affected by this setting.
- Display Both Type/Category/Subcategory And Datix CCS Code Fields. Both the Incident Coding section and the Datix Common Classification System (CCS) section become available for form design. The Datix CCS2 section is not affected by this setting.

DatixWeb Configuration Changes for CCS2
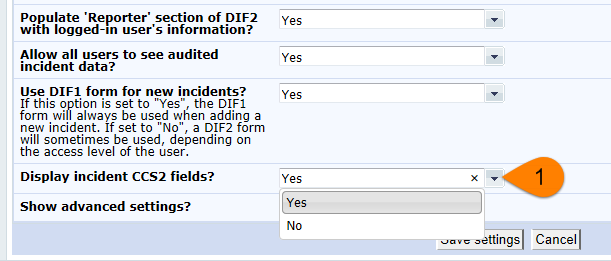
Click and click Incidents in the left-hand navigation menu. Go to the DIF2 Settings area, and choose Yes in the Display Incident CCS2 Fields drop-down list. This makes the Datix CCS2 section available for form design on DIF1 and DIF2 forms.

Displaying and Customising the Incident Classification Sections on Forms
Your users will require access to the one or more of the following incident classification sections on the DIF1 and DIF2 forms. Click and click Incidents in the left-hand navigation menu. Select the appropriate form, and locate the desired sections to make changes. For DIF2 forms, you can the sections as options in the left-hand navigation menu by selecting the New Panel checkbox. This feature is not available for DIF1 forms.
- The Incident Coding section is used for data input with custom
incident classification system in place. The section is not shown on DIF1 and DIF2 forms
in the form design area until you activate it by using the DatixWeb configuration
settings. Once it is available, expand the section, and use the
Hide checkbox to control the display of the section and its
fields.
 Tip: The Type field for selection of the incident type is located in the Incident Details section.
 - The Datix Common Classification System (CCS) section is used for
data input with CCS1 in place. The display of this section in the form design area is
controlled by the DatixWeb configuration settings. Once it is available, expand the
section, and use the Hide checkbox to control the display of the
section and its fields.
 Tip: The Type field for selection of the incident type is located in the Incident Details section.
 - The Datix CCS2 section is used for data input with CCS2 in place.
The section is not shown on DIF1 and DIF2 forms in the form design area until you activate
it by using the DatixWeb configuration setting. Expand the section, and use the
Hide checkbox to control the display of the section and its
fields.
